Tile Leveling Systems: Tips and Tricks
- Share
- Issue Time
- Jan 16,2024
Summary
A tile leveling system is a tool that revolutionizes the way tiles are laid. In this article, we'll explore tips and tricks for using these systems to ensure professional and beautiful results.


Tile installation is an art, and getting the perfect finish requires the right tools and techniques. A tile leveling system is one tool that revolutionizes the way you lay tiles. In this article, we'll explore tips and tricks for using these systems to ensure professional and beautiful results.
What Is a Tile Leveling System?
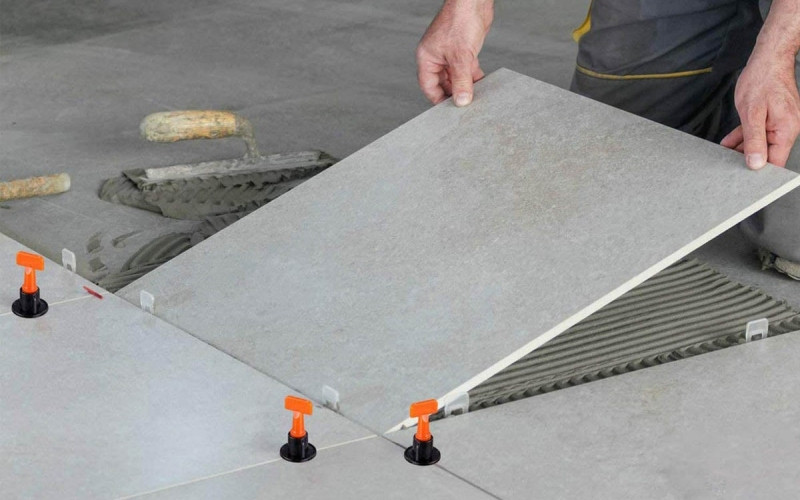
Tile leveling systems accurately level and bond tiles to the surface. They are also called tile leveling spacers.
Most tile leveling systems have built-in levels, tile posts or straps, and wedges or caps. All three components work together to prevent tile lip cracks.
A tile lip is when the edge of a tile is higher than the edge of the connecting tile. Uneven tiles can also cause an uneven subfloor. Uneven floors can lead to trips and other accidents.
Personal injuries caused by improper tile installation can result in your business being sued. Here are the benefits of using tile leveling spacers.
- Helps prevent warping
- Uniform flatness
- Same tile gaps
- Limit tile lip cracks
- Install tiles faster
- Save redo times
Tile leveling tools, specifically strips, keep tiles in place during the bonding and drying process. Therefore, it produces a professional finished look.
The Posts or Clips
Posts or clamps lock adjacent tiles into place. These clamps maintain proper gaps between tiles when the leveling system doubles as spacers. Depending on the thickness of the tile, the gap will be one-eighth or one-sixteenth.
Tile leveling clamps are reusable and replaceable. So you don't always have to buy new ones. However, if you need new clamps, you can sometimes purchase them without having to purchase a new tile leveling system.
The Tile Leveling Wedges and Caps
The wedge is installed inside the strip and the cap is attached to the tip and post. In both cases, wedges or caps press down on the ends of adjacent tiles to keep them level. To ensure that the cap or wedge exerts enough pressure to do its job, use a handy pair of tile pliers to secure them.
Tips for Maximizing Efficiency
1. Small Portion of Work
Dividing your tile installation project into manageable parts is a strategic way to maintain control and precision. Working in a smaller area allows you to focus on achieving accurate tile alignment without feeling overwhelmed. This is especially important when using a tile leveling system as it ensures that each part gets the attention it deserves.
Start by identifying the center point of the room or space and work outwards. This methodical approach ensures a symmetrical layout and minimizes the chance of error. Smaller sections also allow for faster adjustments using the leveling system, increasing overall efficiency.
2. Check the Alignment Regularly
Frequently evaluating the alignment of your tiles during installation can help achieve a polished finish. Rather than waiting until the entire installation is complete to check alignment, make a habit of checking it regularly during the installation process.
Checking alignment includes making sure each tile is level with its neighbors, creating a seamless and professional look. If any deviations are detected, they can be corrected immediately, preventing the problem from compounding and becoming more challenging later in the process. This proactive approach saves time and helps improve the overall efficiency of the project.
3. Properly Remove Clamps and Wedges
The final step in the installation process is to remove the leveling clamps and wedges. Doing this correctly is critical to the appearance of the installation and the efficiency of the overall project. Please follow the tips below to delete it correctly:
Use the Right Tools: Most leveling systems come with specific tools for removing clamps and wedges. Make sure to use these tools according to the manufacturer's recommendations to avoid damaging the tiles.
Wait for a full cure: Allow the adhesive to cure completely before removing the clamps and wedges. Removing it too early may cause the tiles to shift, compromising the alignment you worked hard to achieve.
Follow the manufacturer's guidelines: Different systems may have specific removal instructions. Following the manufacturer's guidelines ensures a smooth and efficient process.
By working in small sections, regularly checking alignment, and properly removing clamps and wedges, you can not only ensure a high-quality tile installation but also optimize the efficiency of your entire project. These tips, if integrated into your tile installer, will help make the process smoother and achieve superior results.
In Conclusion
In summary, mastering the art of tile installation requires using the right tools and techniques. Tile leveling systems provide practical solutions to common challenges, ensuring a professional finish. Whether you're a DIYer or hire a professional, incorporating these tips and tricks will up your tile installation game. If you would like to know more about tile leveling systems or if you would like to order tile leveling and cutting tools, please contact us.
TILER is a quality custom tile tools manufacturer. Since the invention of the first tile-cutting machine, we've been providing a range of innovative solutions for home renovation and improvement projects. With over 28 years of experience, patented technology, and unparalleled production capabilities, TILER has become an industry leader, serving customers in more than 130 countries.
We advocate the spirit of craftsmanship and are always committed to creating perfect, precise, and safe products. Through advanced design, high-quality products, and custom service, TILER makes tile installation simple and provides an enjoyable experience for installers.
Frequently Asked Questions
F: Can I reuse leveling clamps and wedges?
A: While some systems allow reuse, it is recommended that new clamps and wedges be used for each project to ensure optimal performance.
F: Do I need special tools to remove the leveling clamps and wedges?
A: Most leveling systems come with specific tools for easy and safe removal. Please follow the manufacturer's guidelines.
F: Are tile leveling systems suitable for all types of tiles?
A: Tile leveling systems are designed to work with a variety of tile types, but it is crucial to check compatibility with specific tiles.
F: How long should I wait before removing the leveling clamps and wedges?
A: Before removing the leveling clamps and wedges, follow the adhesive manufacturer's recommended curing time.

Tile spacers are placed between each tile during installation to create a uniform gap or joint between the tiles.

Tile spacers are placed between each tile during installation to create a uniform gap or joint between the tiles.

Recyclable Tile Leveling System A42204 | Environmentally Conscious |Efficient Tile Leveling Solution
Recyclable Tile Leveling System is used in tile installation to ensure that tiles are laid flat and level.

The pliers are used to tighten the clips and wedges in place, ensuring that they are securely holding the tiles in position.